.........New Project
Bachmann Class 57/3 in New Logo DRS Livery from R3Sprays
Many thanks to Kevin Bates for providing a cropped version of his 57306 photo taken in July 2016.
|
Introduction: The motive power hauling the MOD nuclear flask trains now often includes Class 57/3 types in their new DRS livery. My painting skills are not up to that challenge, so I've obtained a suitable unit from R3Sprays in Falkirk. The intention is to replace my earlier DRS 57/0 with this unit. I'll either transfer the original LokSound decoder or fit a protodrive Zimo unit, if Paul has one available. I'll design the electrics for the updated lighting to operate from either decoder option. The original Bachmann lighting fit does not include the lower front markers or a night headlight. I will add the missing lighting and arrange for the headlights to be switchable, so that yard operations can be done with just the marker lights active, while main line operations can also use either the day or the night headlight. The lighting at the rear train hook end will be enabled for light engine movements and disabled when in train haul mode. The cab light will be switchable but only enabled when the loco is stationary. I'll omit the detonator flash LED as it hardly ever gets used on the original 57/0. The sound system speaker will be an ESU 50344 20x40mm device, mounted facing downwards in the bottom of the fuel tank, which will be modified to provide a sealed enclosure. |
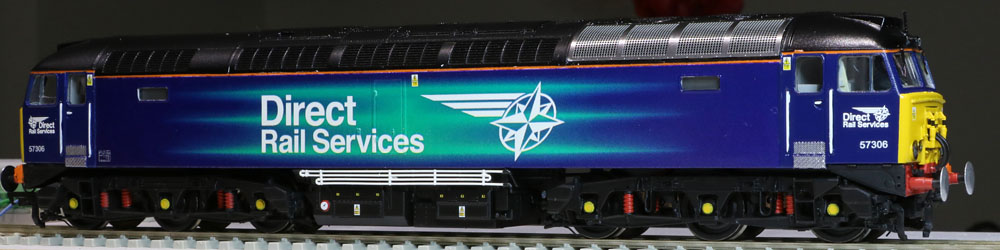
R3Sprays interpretation of Bachmann's 57306
Possible Circuit Configurations:

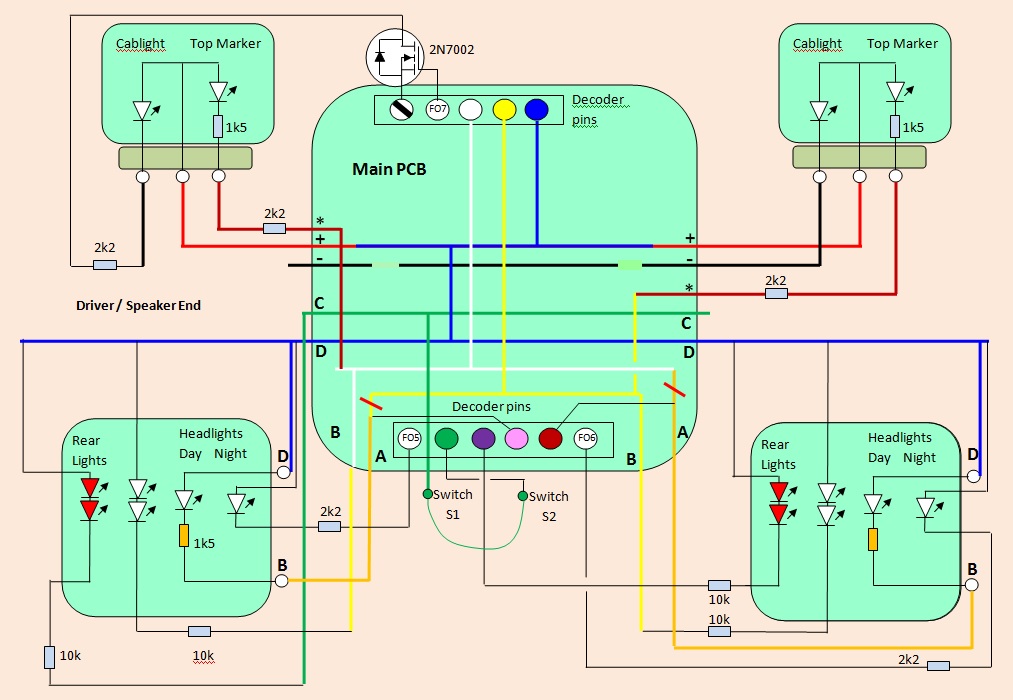
LokSound V4 21 pin Circuit Concept. (Only 6 function outputs available.)
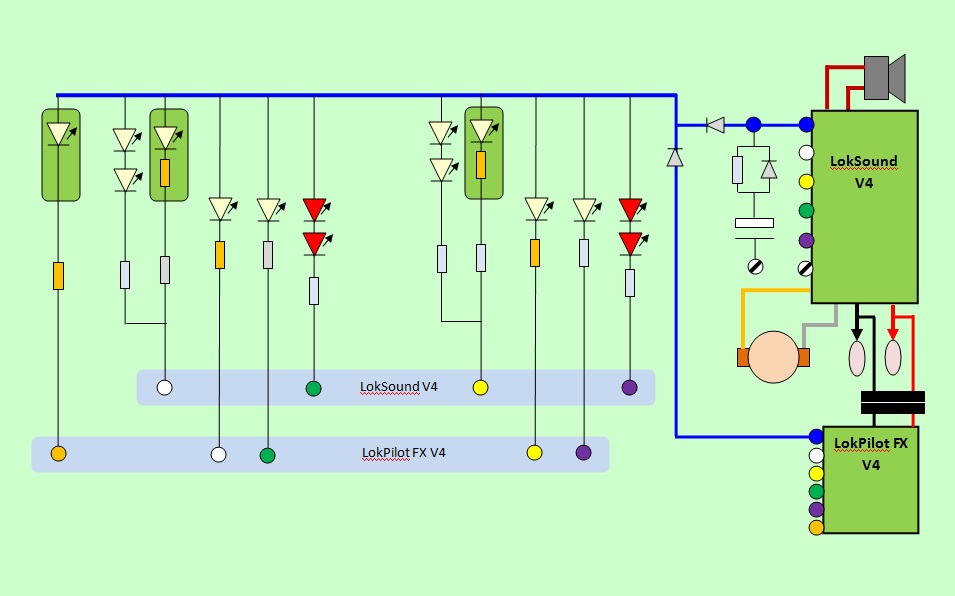
Or keeping it simpler by using an additional Function Decoder.

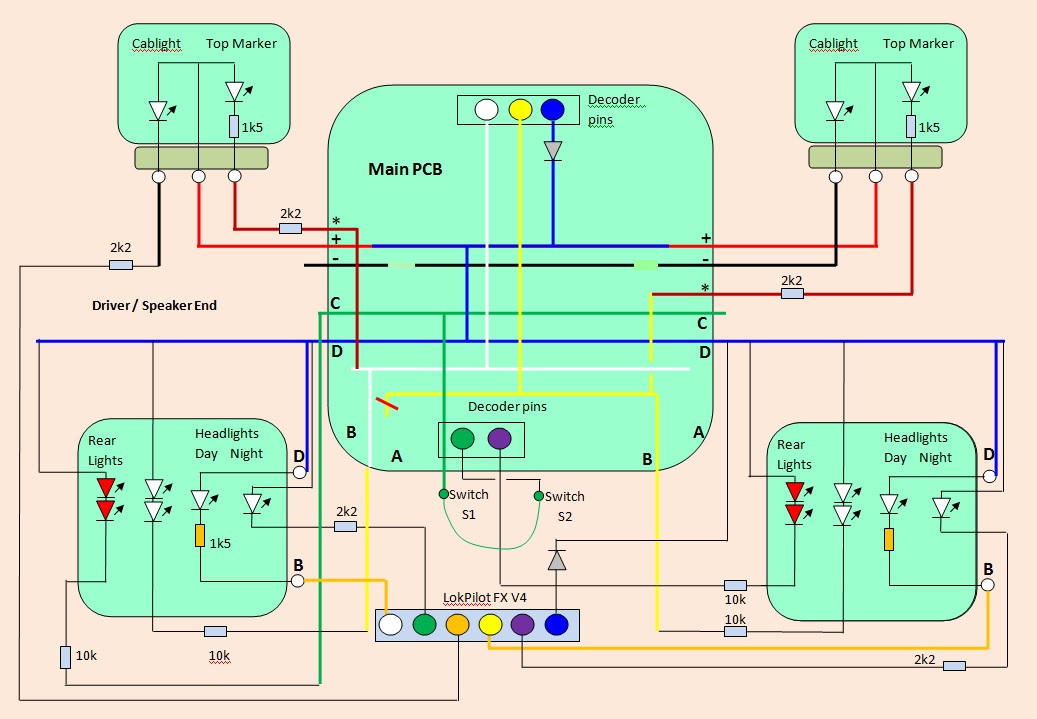
Zimo 644D Circuit Concept. (Simpler solution due to extra function outputs on the Zimo decoder.)

Showing how the LokSound V4 plus LokPilot FX V4 circuit could be implemented.
Showing how the Zimo circuit could be implemented
|
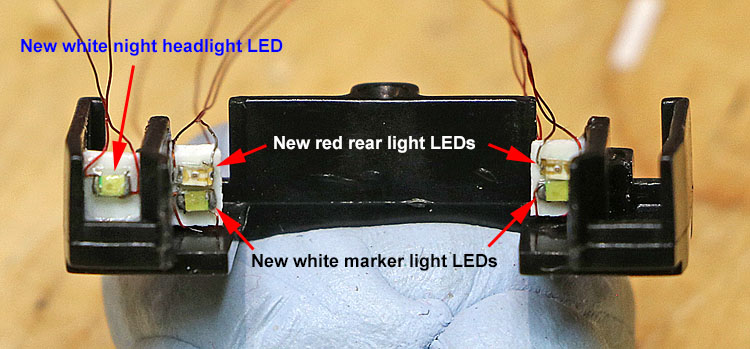
Adding the missing running lights: The original rear light LEDs were removed. The new LEDs are all pre-wired chip LEDs. These are first super-glued to small rectangles of plasticard. The plasticard sub-assemblies are then super-glued to the black plastic shroud moulding.
White paint is added to reflect the rear light or marker light output in an attempt to make it somewhat less directional. The lighting PCB is modified to interface with the new LEDs, including a PNP transistor soldered to the rear of the lighting PCB.
|
|
A Note of Caution: Fragility of side transfer arrangement: The new DRS logo on the sides of the central region of the locomotive, between the cab doors, looks very effective...... but the paint colour below the entire transfer appears to be white. This means that any damage to the side transfers will expose the white paint, which of course looks very conspicuous against the DRS blue background. (I just made a small nick on the bottom edge of the upper body shell when separating it from the chassis, with my thumb nail.) I can touch this in quite easily, but it indicates that great care will need to be taken in future when handling the locomotive! |
|
Cosmetics: The overall effect is pretty good, in particular, the difficult side transfers are done very well. However, some of the details need a little extra work: The conspicuous white grab rail on the locomotive front immediately below the windscreens has been over sprayed in yellow, with some minor skinning between bodywork and bar. This will need some careful cleaning up and a white paint job on the grab rail. The adjacent lamp brackets are also yellow, so need over painting with white. The black paint trim around the headlight and marker lenses has strayed a little into the yellow. This will need some careful tidying with white u/c and yellow. The white painted vertical grab rails beside the doors need some attention. These have been over-sprayed in blue then touched in using white, with a few imperfections. Dummy yellow canvas covers are needed over the drop-down coupler mechanism, to mirror DRS practice. (I'll try making a Blu-Tack cover painted in matt yellow.) A light matt (enamel) varnish overspray to the roof maybe desirable to dull down the semi-gloss finish, hopefully giving a slightly weathered appearance. One of the metal roof side grills fell off, but I've already carefully glued it back in place using tiny blobs of Glue 'n Glaze. At the end of the project, the Bachmann hose accessories provided will need to be glued to the front buffer plate. |
|
LokSound CV Programming: The lighting control is via ESU's Standard Function Mapping:
LokSound CV Programming
(A "super shunter" mode with alternately flashed markers and rears on at both ends is included.) LokPilot FX CV Programming
All works fine! Motor Control CVs
|
|
Zimo CV Programming: The lighting control is via Zimo's Swiss Mapping:
Set CVs 34 & 35 to zero Set FO7 to logic FO (not Suzi) CV124=128 Set FO7 to stationary only CV159 to 60
Motor Control CVs
All works fine! |
For video of initial solution, click here
|
Final choice of decoder sound system: I like the Zimo driving characteristics, which give a number of user control features not yet available on LokSoundV4, and Paul knows how to get the best out of them. This would be the decoder of choice..... except, as Paul warned me, the engine sound clips used, are from quite some time ago.... When I compared them to Biff's engine sounds in my original 57/0 decoders, I had to concede that despite the limitations of the LokSound driving arrangements I preferred Biff's engine sounds. So in the end I've gone for Biff's LokSound solution (transferred from my earlier 57/0)......However, all is far from lost for the pair of Zimo decoders, originally intended for the two locos on the MOD flask train: One now has a Gresley A3 sound project on board, ready for my Scotsman and the other has now replaced my original Biff Class 31 LokSound solution, with Paul's excellent recent Class 31 recordings and all the advantages of the Zimo driving options......but that's another story! |