Hattons Class 66 with Bif's V5 & EM2


Hatton's impressive sound fitted Class 66 arrived just as the Corona virus lock-down began. The package, retrieved from our door step using disposable gloves then spent 72 hours plus in quarantine, before I plucked up the courage to open it!


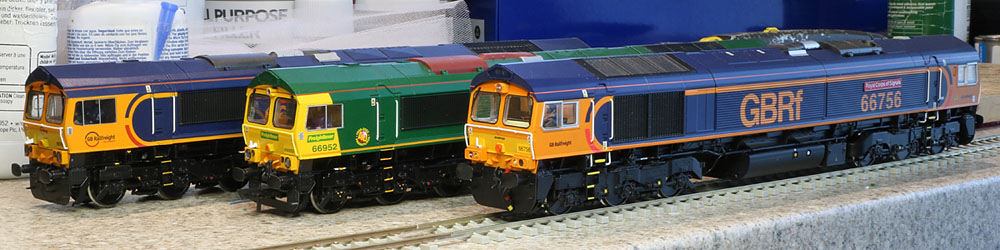
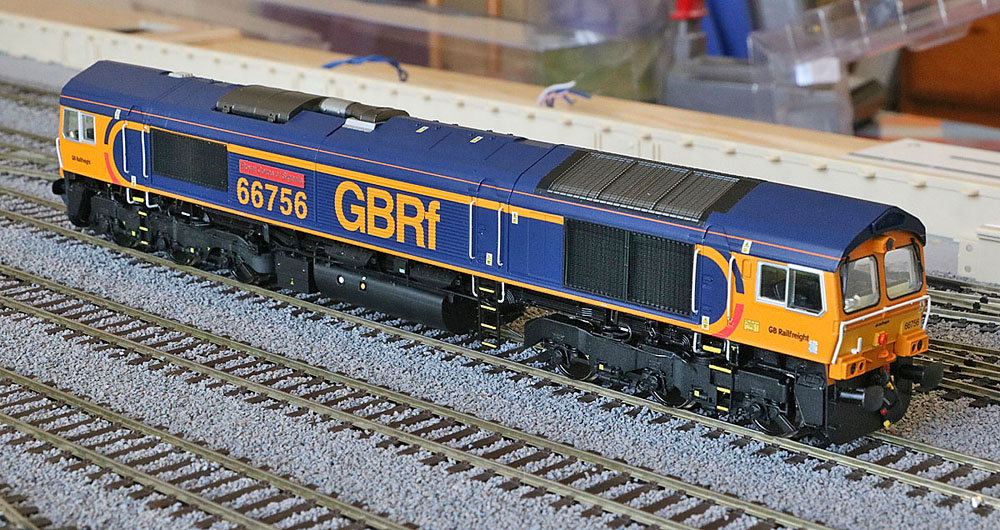
Straight Out Of The Box:

Good news!  No obvious build issues or missing parts! In particular, no cosmetic problems on my example, GBRF number 66756 "Royal Corps of Signals". The level of detail was a big step-up from Bachmann's 66, which despite forming an industry standard for a considerable number of years, is now beginning to show its age. The Hatton's model is also considerably heavier.

The only obvious visual omission was the lack of a miniature driver in the front cab. 


Initial DCC Testing:

Firing up the sound for the first time produced some impressive bass content thanks to the big EM2 speaker. (Fortunately I'd remembered to wind down the master volume first.)

However very slow speed movement was not as smooth as I had hoped. As speed was increased, although the motor behaviour improved, a distinct side to side wobble also became apparent.

Lighting all worked as advertised, with (unlike Bachmann) all three marker lights operational. Day or night headlights, train end lights disable function plus a parking lights option were all in place. Also directional cab lights configured to extinguish during driving. However, the top front marker lights were disproportionately bright (brighter than the headlight from most angles.) 

Just like the real Class 66, the outer wheel bearing covers rotate with the wheel axles. (I can only see this feature by getting close to the locomotive with my reading glasses on.) Unfortunately, not so prototypically, the central bearing covers on each bogie, also move in and out from side to side when negotiating curved track. Although an interesting innovation, this feature has proved to form the models main Achilles heel, as becomes apparent further down this page.......

So, although a really impressive model with excellent sound and very flexible lighting, there were quite a few issues to address before the loco joined the fleet.


The rotating wheel bearing covers

1) Improving motor control:

Hesitation was initially apparent at speed steps 1, 2 and 3 out of 128.  This was much improved by changing CV51 to 10 and winding up CV52 to 100...... (much higher than I've ever used on a V5 before).

I also changed the speed control characteristic from linear to the exponential 1 setting on the LokProgrammer.  This combination resulted in very smooth acceleration and deceleration in normal use.

I was a little uncomfortable leaving CV53 as high as 160. Past experience suggests that anything higher than around 130 has very little impact on the actual speed range. I may have got the wrong idea, but I brought CV153 down to 120 and adjusted the max speed, using CV5, which I set to 160.

2) Fixing the Wobble!

Despite a thorough running in session around the loft layout, the lateral speed dependent wobble was still very apparent...... this was an operational killer, making the locomotive look very unrealistic.

In fact the only result of an hours continuous movement was that one of the rotating axle ends separated from its axle..... Close observation revealed that the surface of the axle end piece in contact with the bogie side piece hole was contaminated with glue, making it not exactly circular in section...... This had to be a likely cause of the wobble. So I removed all the axle end pieces and tried again..... magic!!! The wobble had disappeared.

The axle end pieces are purely cosmetic, with the actual axle bearings inboard. I find distance glasses more useful when watching train movements across my layout, so for me, the fix was a no-brainer: Cut off the end caps of the axle end pieces and glue these over the holes in the bogie side pieces. Still a more impressive level of detail than the Bachmann bogies and no more side to side wobble!    The other fix I understand (for those without the need for optically corrected vision) is to correct a small moulding error in part of the bogie structure and then drill out the bogie side frame holes to around 3mm providing more clearance and then re-fit the complete axle end pieces. (Check out Peter Dixon's YouTube channel to find his tutorial on this subject.) 

3) Lighting, Driver and stay-alive:

To reduce the intensity of the upper marker lights, fit a driver and install a stay alive super capacitor, the chassis and upper body shell need to be separated...... Not quite as simple as the manual suggests..... but OK once you get the hang of it.....re-assembly was even more interesting!

Inside the 66 (with a pair of miniature 10k resistors added in series with each upper marker LED).

Dimming the Upper marker lights:

To reduce the intensity of the upper marker lights, I first added miniature 10k resistors in series with the cables to the spring contacts at each end. This helped a bit, but the LEDs were still too bright. I ended up fitting a single 47k resistor in place of the twin 10ks in series with each LED.

Driver:

The cab assembly was carefully extracted from the front end (the end without a coupler fitted) and a somewhat under scale Preiser driver was glued in place. The cab was then clipped back in position.

Decoder mounting arrangements:

Although the decoder was working correctly, it was sitting at an angle within its socket due to a PCB component clash.

The problem part on the main PCB turned out to be an over voltage protection device connected across the motor, labelled DZ1. A bit of experimenting revealed this to be equivalent to a pair of back to back 28 Volt zener diodes. A ceramic RF suppressor capacitor was also fitted in parallel with the motor. Rightly or wrongly, I don't believe either of these parts are needed when operating in DCC from a LokSound V5, so I've removed them both. I added insulation tape to ensure no electrical shorts occur between the exposed PCB pads and the decoder underside and the decoder now sits horizontally on to the board.


Adding a Stay-Alive Circuit:

For added reliability, I've added an AVX 6800uF 15Volt supercap, sourced from YouChoos, with a simple zener diode protection circuit to prevent excessive charging voltages.

The stay alive circuit is bonded to a plasticard substrate which is in turn glued to the chassis block.  The decoder is shown now sitting down properly in its socket.


Simple stay alive protection circuit

Hattons 66756 beside two Bachmann V5 equipped 66s

Additional Driving Refinements:

1) Braking Changes:

 Bif's standard set-up involves the use of long acceleration and deceleration periods to simulate the momentum of heavy trains. This is supported by a brake key which reduces the deceleration time when needed.

I have adjusted the brake CV from Bif's reduction in stopping time of 50% to a reduction of 80%, in order to provide somewhat speedier braking (CV179 to 204) . I have also modified the function mapping to make key 5 work as the brake key on all 3 function key ranges. (i.e. F5, F15 and F25)

2) Train loading simulation:

I've also used the LokSound V5 variable load options to add a light engine operating mode with lower simulated momentum shorter acceleration and deceleration times ("Optional Load" CV103 to 63) and a maximum load train mode which extends the acceleration and deceleration time to simulate very high momentum train operation ("Primary Load" CV104 to 255).


Additional Lighting modes:

I have added two new lighting modes.... The first is a real requirement, its "Yard mode" on key 23, which disables the headlights (to avoid dazzling the yard crew.) while leaving marker lights on, plus rear lights if operating light engine.

The second is my own spin on shunting with a 66. Dedicated shunting locos such as the Class 08, switch white marker lights and rear lights on at both ends simultaneously when shunting in the yard. However, because the later 66 models have dual function lower marker lights and rear lights in a common lamp housing, lower marker and rear lights cannot be displayed simultaneously...... unless of course they flash alternately. I call this arrangement "Super Shunter" mode, on key 24.

These additional lighting modes do not require any hardware changes, just some additional entries in the function mapping and outputs CVs.

The new 66 driver getting in some practice.


Bif's Function Mapping As Received:


Revised Function Mapping


d

Function List


Conclusions:

With a few adjustments, the Hattons DCC sound equipped Class 66 is a superb DCC sound locomotive!

The level of detail and the cosmetic finish are both excellent.

It runs really well, it sounds really good with exceptional bass content for a 4mm scale locomotive and has enormous pulling power.

The comprehensive lighting works well (and lends itself to simple enhancements.)

The rotating wheel bearing covers were a brave attempt at even greater protypical accuracy, but unfortunately have proved to be a bit of a design disaster..... but at least its a problem with relatively simple fix options.

We have a new "best in class" OO gauge Class 66 !!!


Supplier website links:
Hattons    This Class 66 was designed by and sourced from Hattons.
YouChoos    Source for Stay alive super capacitor.


Click to move back to Model Rail Index Page