Bachmann A2 Sound & Lights Update

After reading a little about Arthur Peppercorn's contribution to steam locomotive design as the last Chief Mechanical Engineer of the LNER, his A2 class pacific design stood out as something rather special.  It also provided an excuse to sample at first hand, the quality of Bachmann's steam locomotive products for the first time.

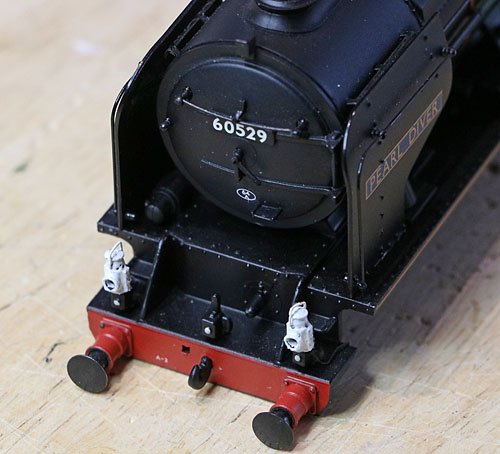
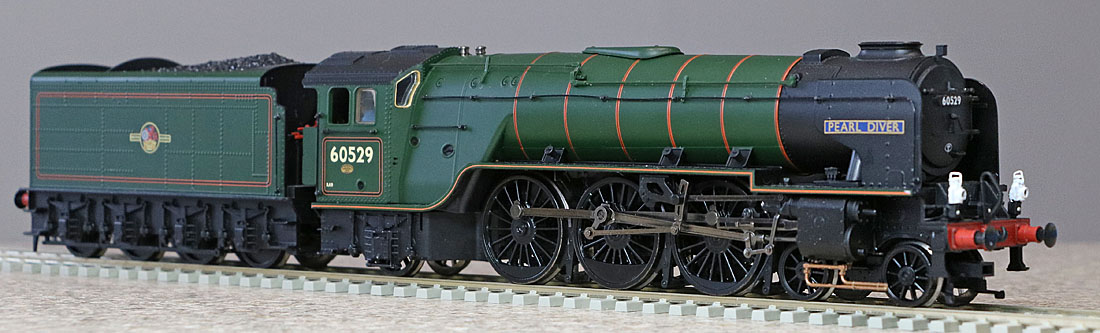
60529 Pearl Diver (Hattons photo).


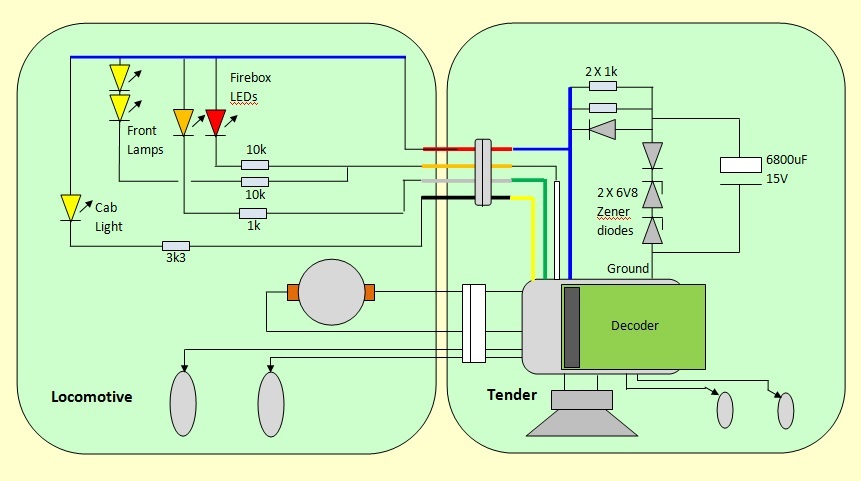
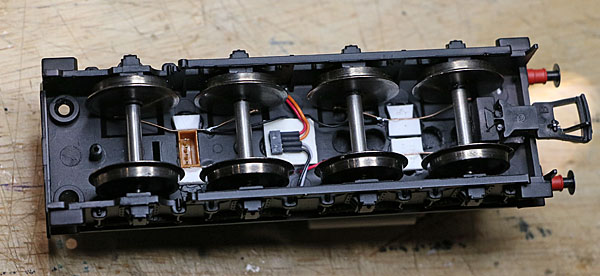
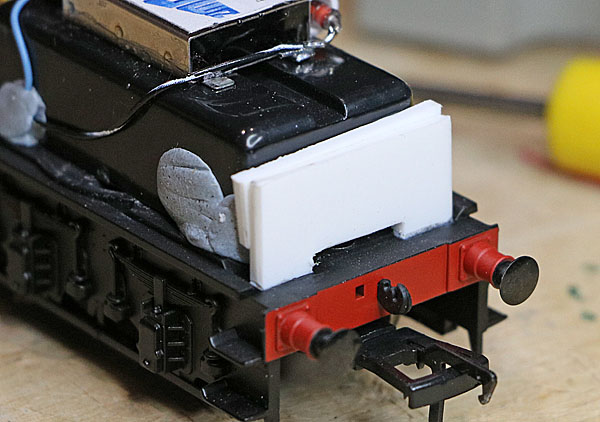
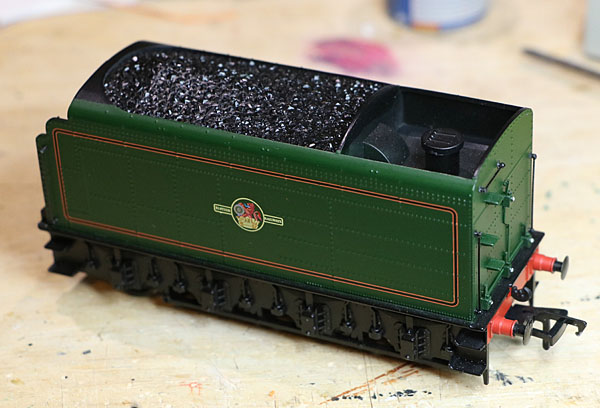
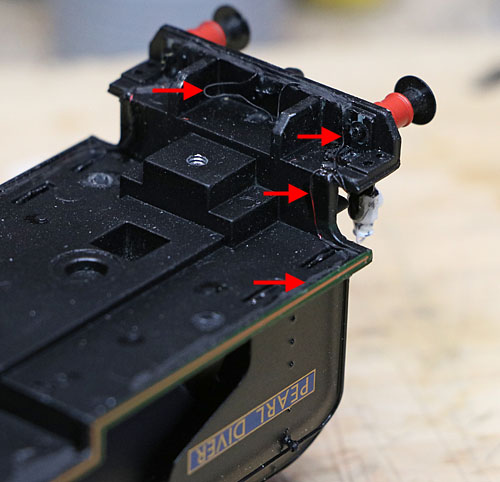
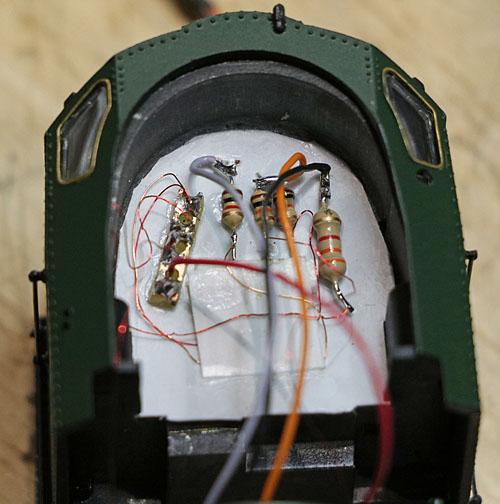
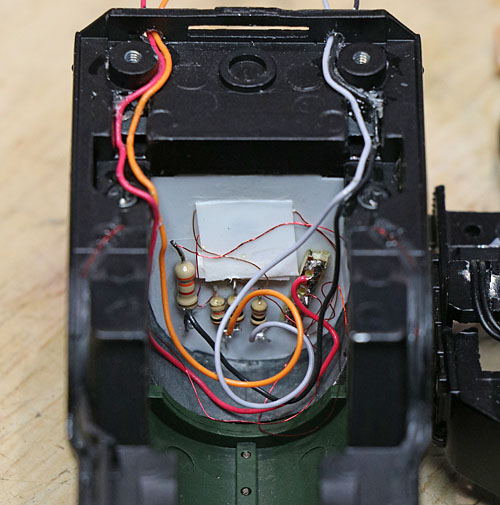
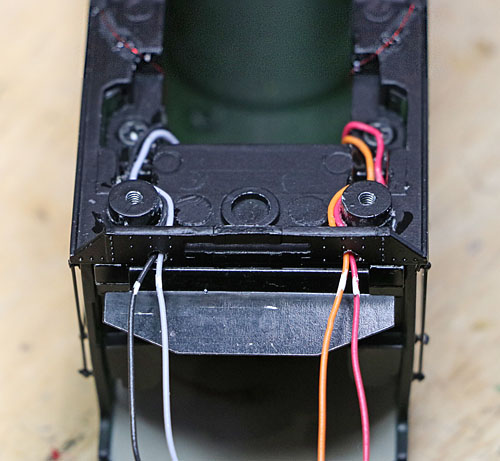
Likely scope of the update:

South West Digital A3 LokSound V4, or Digitrains Zimo A3, whichever gives the best results...... Both exhibited similar motor control characteristics, but there was little doubt that the audio quality and behaviour of Paul Chetter's (aka Digitrains Active Drive) A3 is the best!

Downward facing 20x40mm ESU 50334 speaker in its standard enclosure in the tender (with plastic material removed from the floor to improve the sound output).

Twin DCC Concepts oil lamps mounted on the bottom outside brackets, plus fire box red and amber LEDs. Also, these locos had an electric cab light. (TMC micro connector back to the tender.) 

Stay alive capacitor in the form of a Zimo 6800uF super cap in the tender, with a zener diode protection circuit to keep its charge voltage within specification.

Plus wheel contacts fitted to the tender (none fitted by Bachmann!!!).


Another Hattons shot.


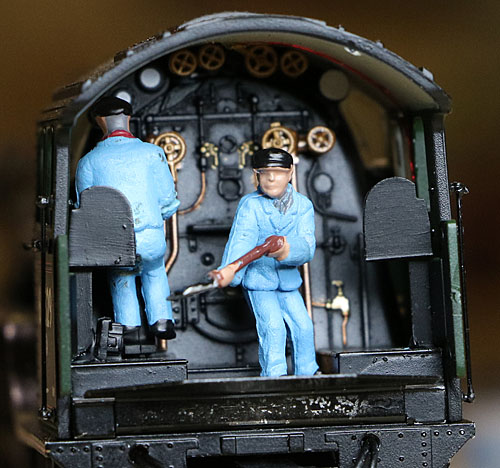
First impressions:

Straight out of the box, the initial impression was good, with a familiar shape, good finish and crisp graphics.  Looking more carefully, some minor issues became apparent:

The wire hand rail on the right hand side of the boiler was bent away from the boiler in one section. (Remedied by careful straightening)

There are minor signs of paint abrasion on the underside of the chassis and there are scratch marks on the underside of the left hand piston housing. (Fortunately neither are noticeable when the loco is mounted on the track.)

A brief run using DC analogue control on a short track section suggested reasonably smooth motor performance.


Dismantling the Tender:

I couldn't believe this one! .....Either a big Chinese clanger, ...... or a strange Chinese sense of humour..... The rear screw holding the tender upper body to its chassis is positioned immediately behind the rear axle and coupling retainer. Neither of these are designed to be removed......so without a classic sub miniature right angled posidrive :-) you are stuffed!  Fortunately the screw was not tight (I wonder why :-) and I managed to wriggle it off. Needless to say, that will be the subject of a modification. It looks to me as if the upper body shell column that receives the screw, should have been moulded a few mm further back, to correspond with the location of the coupling retainer screw......I've removed it completely to make plenty of room to mount a 20x40 ESU 50334 in its standard enclosure. I've installed a simple tab and slot arrangement to hold the rear of the tender body and its chassis assembly in place, making that impossible fixing screw redundant.

There are no wheel contacts on the tender as delivered, so the loco relies entirely on the 6 driving wheels for electrical pick-up. Even with a stay-alive cap, this looks a bit optimistic!  I've now fitted phosphor bronze strips, that rub on the inside surface of all 8 tender wheels, to supplement the loco driving wheel pick-up contacts.


First DCC slow driving tests with a Zimo decoder & with a LokSound V4:

First, with a Zimo 644D. Not too bad in the forward direction, a bit of the jitters in reverse.  The need for wheel contacts on the tender was confirmed after several failed starts due to contact issues, despite a very clean test track (before I added the phosphor bronze wheel wipers). I've also dismantled the loco, removed the motor capacitors and thoroughly lubricated the mechanism. Also carefully filed down a couple of what looked like solder splats on the left hand central driving wheel rim??? More running in required and I need to try 40kHz motor frequency now those caps have gone.... no improvement, so back to 20kHz.

Trying a LokSound V4, (SWD A3 "U-Drive"). Motor control was no better that with the Zimo decoder fitted. (LokSound V4 excels if jerky behaviour occurs predominantly at or near minimum speed.) However, the A2 hesitations occurs predominantly when in reverse and are not limited just to minimum speed. Its probably related to peaks in the loading on the motor caused by imperfections in the running gear motion.

So the choice of decoder is dependent on the subjective quality of the sound project and the driving experience available.... In the absence of smoother running on the part of the LokSound V4, the choice is an easy one, with excellent sound quality and superior Zimo driving attributes thanks to Paul Chetter's sound project.

Now the loft layout is working again (with the inner ring tracks now live too) I've started to run in the loco. Difficult to tell but I think its getting a little smoother. The new tender wheel contacts (now fitted) are working well, with no stall problems up there so far.

With the loco dismantled, the cab forward bulkhead appears to be metal, which may make firebox door lighting unrealistic.....we'll see if I can hand drill a hole through the metalwork!  .........It turns out that the cab can be unbolted from the rest of the upper body assembly. This enabled me to use a power drill to make a suitable hole in the metal casting from the rear!


The planned circuit diagram.


Tender modifications:

Showing the new phosphor bronze wheel contacts.


With a little surgery to the tender upper body, an ESU 50334 20x40mm speaker and the Zimo 6800uF stay-alive capacitor, can be accommodated. The 15 Volt super cap is  powered by a protection circuit, to ensure that the maximum capacitor voltage is not exceeded, even if its used on a higher voltage DCC system than my Lenz unit:

Showing the ESU 50334 20x40mm speaker and Zimo SC68 super cap fixed in place.

(The sleeve beside the capacitor houses the zener diodes & prevents shorts to the capacitor body.)


A little surgery was needed inside the tender bodywork to provide sufficient headroom for the speaker and super-cap.

(New tab and slot not yet fitted on this photo, at the rear of the tender body.)


4 way lighting connector glued to underside of tender & coupler re-attached.


Tab glued to rear inside lip of the tender upper body.


Slot glued to top of chassis assembly.


Tender, complete with ballast weights hidden under the dummy coal load.


Fitting lights to the locomotive:

Two DCC Concepts oil lamps are fitted (painted overall matt black, then white again, to prevent light leaking out of the body sides.) The wires are routed back to the area between cab and motor by glueing to the underside edge of the running boards. Wire & glue were then painted  matt black.  A hole was drilled through the metal firebox door moulding. Then the hidden side of the metal bulkhead was covered with a thin plastic sheet for electrical insulation. (With a hole cut directly behind the hole in the metal bulhead.) A red led and an amber LED were mounted directly behind the hole, using another small piece of plasticard to set them at a slight angle. The cab light LED was glued to the roof underside. All the LED series resistors were glued to the plastic substrate behind the firebox. The lighting cable, was routed out to the rear of the cab floor and is terminated in a plug that can be inserted into the socket under the centre of the tender. 


Two oil lamps up front.


Showing the wire routing.


Red LED above amber LED behind hole in firebox door.


Yes, the A2 really was fitted with an electric cab light.

(Glued in the model to the centre of the cab roof.)


LED series resistors glued to a plastic substrate fitted to the rear

of the cab front bulkhead. (Which unusually can be removed from the loco body.)


Cab refitted and wires to tender routed through narrow gap in cab floor structure.


Wires to the tender emerging through holes drilled through the metal back plate.

(They will be painted black.)


CV adjustments to the Paul Chetter A3 Zimo Decoder:

Paul's decoder provides all the steam sounds for an East Coast mainline 3 cylinder pacific. However, a few changes are required to optimise performance and get the lights to behave as required:

Lights:

I would like the front lamps and red firebox glow to be activated by F0, but also, to be non directional.

To achieve this, CV33 is set to 0 and CV125 is set to 0 to disable conventional mapping. Swiss mapping is then used: CV430=29, CV432=14 & CV434=14.

The amber LED is to simulate the open fire during coaling and this is part of the standard sound project, with Aux 1 triggered in flicker mode, by the coaling sound.

The cab light is to be switched via F21 using Swiss mapping (on the yellow rearlight Function wire). CV34=0, CV126=0 to disable conventional mapping, then using Swiss mapping: CV436=21, CV438=15, CV440=15.

Drive adjustments:

CV3 set to 70

CV4 set to 50

CV9 set to 87

CV57 set to 120

Assign Safety valve release to key 10:

Set CV540 to 143

Set CV541 to 50

Miscellaneous:

Set CV395 to 90 (max volume)

Set CV1 to 48  (DCC Address)

CV267 = 70 to achieve 6 chuffs per wheel revolution (Gresley 3 cylinder beat).


Driver & Fireman on board.


The completed locomotive.

For You Tube Video of the A2, please click on this Line

Supplier website links:
Hattons    A2 sourced from here
Digitrains    Source for Zimo stay alive super cap, LEDs, oil lights and speakers. (They also sell Paul Chetter's A3 sound project on the Zimo MX644D decoder.)


Click to return to the Home Page