Hornby Class A4 with Kylchap Double Chimney


Gresley's classic express passenger locomotive.  This example is in wartime LNER black livery, ready to haul long troop trains on our Histon village layout, in our 1944 scenario. As a youngster, I used to see these machines, in BR green livery, at Peterborough station in the late 1950s.


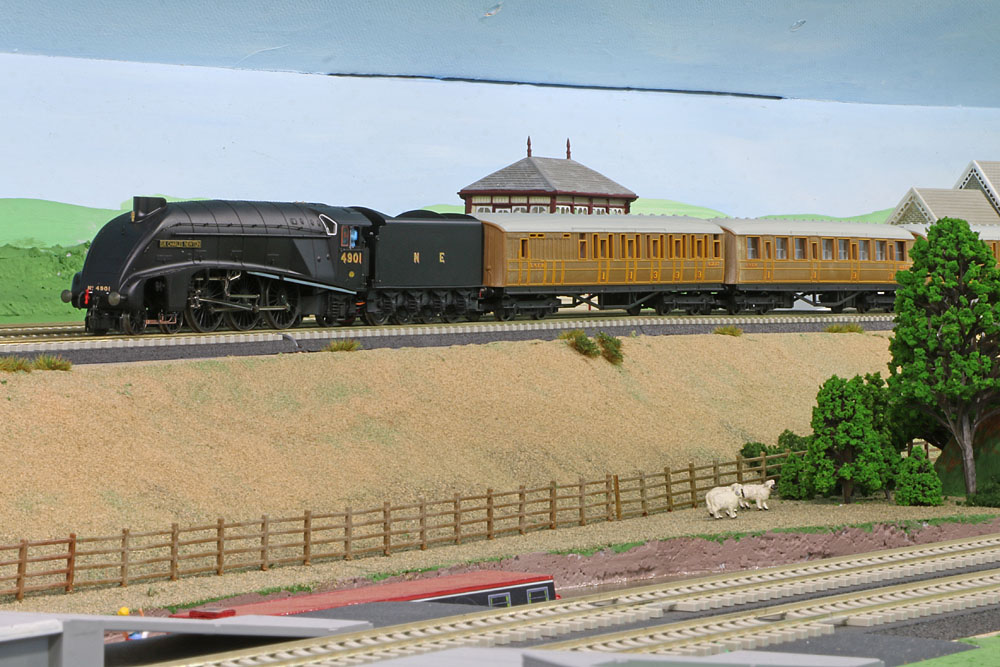
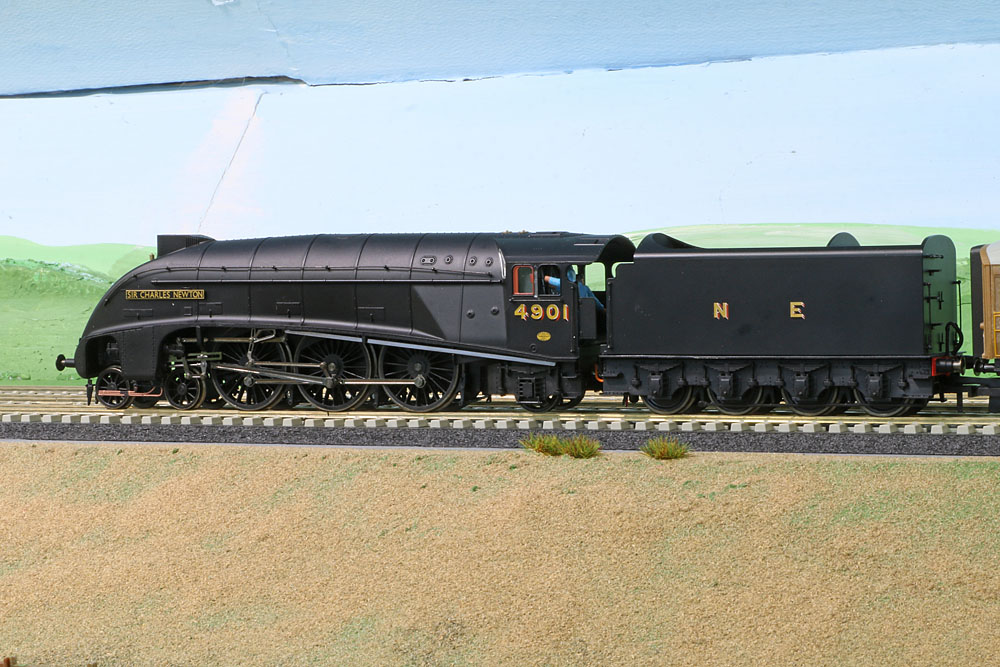
Background:

My childhood memories of the A4s on the ECML are exclusively double Kylchap chimney variants with the original side valances removed. Unfortunately, all recent Hornby A4 releases have involved single chimney variants (except for Railroad Mallard models in blue with valences fitted).  These just don't look the part to me.

It is still possible to find Brunswick green BR A4s, but rarity seems to have pushed the purchase cost beyond what I was prepared to pay....... However, Olivias Trains in Sheffield had stock of an A4 in the required configuration, in wartime black livery. A discounted price tipped the balance, so with a little imagination, the plan is to run the model, hauling troop trains, between our warwell tank trains, as part of our WW2 period sequence, on the Histon village layout.


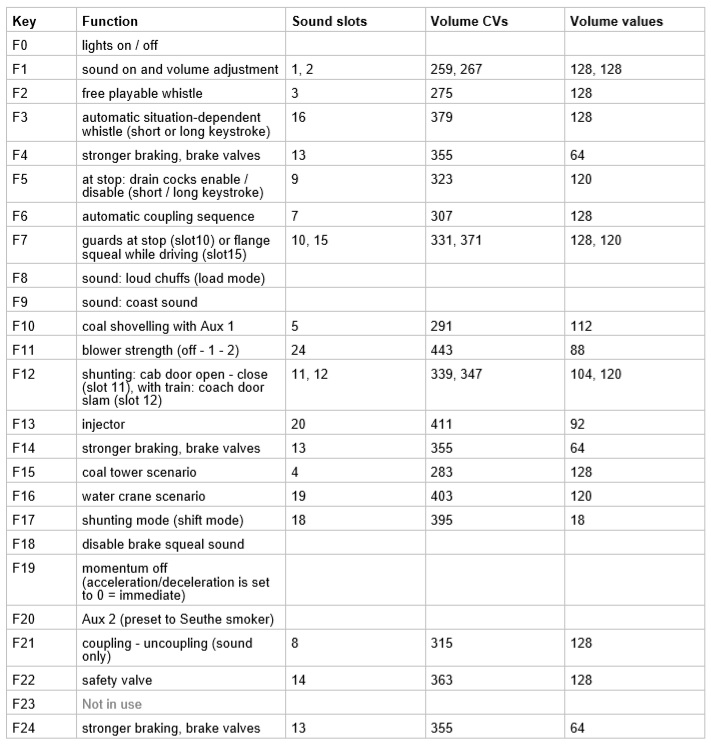
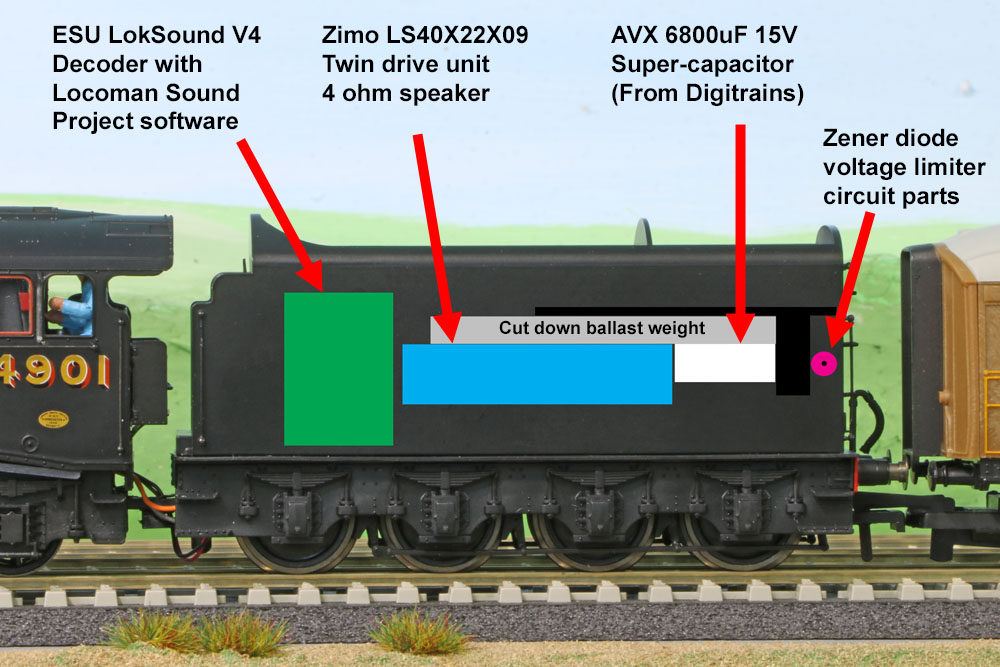
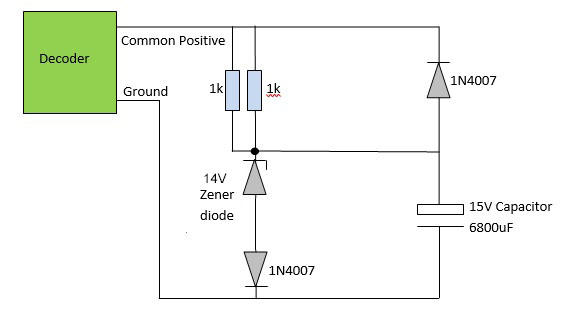
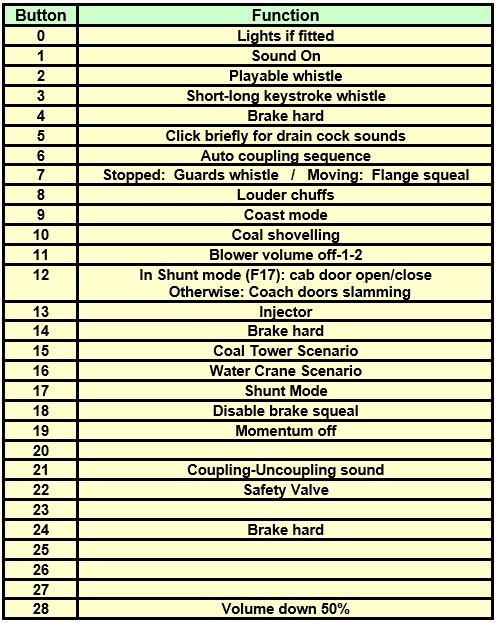
DCC Configuration:

The A4 gives me the opportunity to try a new source of steam loco sound system. I plan to install an ESU LokSound V4 equipped with "Locoman" sound project software.  Although this model has the well regarded current Hornby body mouldings and running gear, it is early enough to have an 8 pin DCC socket within the loco body. The tender also has wheel contacts, but relies on the old Hornby coaxial connector between loco and tender to link these to the DCC socket. I propose to re-wire the motor and loco wheel contacts back to the tender, where I will fit the decoder, speaker and a 6800uF stay alive capacitor with an over-voltage protection circuit.

Much to my surprise, I received a phone call from Locoman, a few hours after placing the decoder order, to confirm the package would be in the post, special delivery for the following day and requesting my constructive feedback on how I find the sound system behaves.  Good to see such an enthusiastic response!


DC Testing:

The locomotive is a smooth runner in DC configuration, straight out of the box. Slow speed running is quite reasonable for a Hornby steam loco under DC control. Using my bench power supply which provides pure DC, the motion is virtually silent at slow speed. So I'm not expecting too much of a drama when I try to optimise the DCC motor control.


Lighting:

Initially, the model will not be equipped with working lights. (Discs will provide the head codes). In future a pair of LED lamps may be added to the front lamp irons and flickering firebox LED(s) may be installed. An additional 4 way connector will be used to carry the function and common positive supply connections, if working lights are added.


Sound Function Mapping:

We currently run our steam locos with a common set of sound function mapping, covering function buttons 0 to 9.  This provides essential functionality without the need to select different button ranges on the Lenz controllers.

The Locoman sounds are mapped in quite an efficient way, sometimes employing the same button to activate different sounds depending on whether the loco is stationary or under way.  So although some changes will be required, I'm hoping to also make use of this type of approach. 

The ability to force coasting on F9 and loud chuffs on F8 look really useful for the loft layout.

Locoman Original Settings:

(F25 to F28 not used)

Note: Ensure CV31=16 and CV32=1 before tweaking any sound volume CVs


Wiring the locomotive:

The 8 pin socket and the DC motor suppressor components were removed. Wheel contact wires (red RHS, black LHS) and motor connections (orange and grey) were soldered in place and routed to the loco rear. The lower motor contact looked a little close to the chassis for comfort, so a small plasticard insulator was super-glued in place to prevent unwanted shorts.

The much simplified new locomotive wiring.


Adding the footplate crew:

This is much easier to do before the upper body shell, incorporating the cab, is re-united with the chassis:

The gauges look almost convincing :-)


The tender modifications:

A layout has been decided upon which enables a large part of the original ballast weight to be incorporated:


Side view of the tender with an indication of the internal location of the major sound system parts.

The tender internal coal hopper has been removed. The original ballast weight has been reduced in length by around 20% and then bonded securely to the underside of the tender rear deck.  The stay alive super-cap and a twin drive unit Zimo "3D" speaker have been bonded to the underside of the ballast weight. The LokSound V4 decoder is fitted diagonally across the full height space in front of the speaker and ballast weight. The motor and wheel contact wires are permanently wired between tender and locomotive. The speaker sound waves exit the tender body via the large rectangular cavities around each of the eight wheels.


Stay-alive Circuit


Locomotive packing:

The Hornby box is the old split expanded polystyrene moulding style.  In order to carry the now permanently close-coupled loco and tender, I had to perform some careful surgery to the forward end of the tender cavities in both top and bottom polystyrene mouldings.  The clear plastic cover plate also required modification to clear the add-on drain cock pipes below the outer cylinders.


The Completed Locomotive under test:

It all works very well!   Locoman's decoder sound quality is excellent. I particularly like the chime whistle sequences!

The locomotive is straightforward to drive. The driving sounds can be adapted to the situation  as required..... e.g. optional drain cock steam release for cold starts, optional louder chuffs for slow acceleration of a heavy train. (Chuff sound level changes for normal acceleration are automatic, simulating driver cut-off control.) Also coasting can be enforced, which is handy when approaching the platform at slow speed.

An active brake key is provided (conveniently duplicated on keys 4, 14 and 24). This has the effect of dropping CV4 to a suitable fraction of its normal (momentum simulating) value.

I've dropped the volume levels of the coal shovelling, injector and coupling sounds..... and slightly increased CV3 to extend the acceleration times a little, but otherwise, retained the original locoman settings.

Operation is similar to a Digitrains / Paul Chetter Active drive Zimo decoder..... but I find the addition of directly user selectable coasting a potential advantage, when on a station approach. (Particularly if using PC control.)

   Hauling 6 Gresley coaches on the loft layout (Those Railroad coaches are due for replacement!)


Locoman has programmed in a custom speed curve incorporating a smooth very slow starting region which gradually linearises as speed is increased. This enables some very impressive slow speed manoeuvring..... But...If the speed control is set at eg 50% to start movement and left there, leaving acceleration under the control of CV3, this can result in a slightly disproportionate acceleration as the loco speed approaches the linear portion of the curve when viewed critically on a straight test track..... but in fact its barely noticeable when operating on the loft layout, so I'm not finding it a problem.

Great to at last have an A4 join the fleet!

d

Function List


Supplier website links:
Olivias Trains    The A4 was sourced from Olivias (with a 10th birthday discount).
Locoman Sounds    Source for Locoman sound project on ESU LokSound V4.
Digitrains    Source for speaker and stay alive capacitor.


Click to move back to Model Rail Index Page